Camp Grandma #6 How to make a Piñata
Sunday is our Camp Grandma, end-of camp celebration. We’ll have balloons, games, prizes, and snacks for our two grandkid campers. In preparation, Miss T crafted some of the game components and learned to make a piñata.
How to Make a Piñata
Basically, the steps are: 1) blow up a balloon, 2) paste over it with strips of paper, leaving an opening for filling the piñata with treats, 3) attach a string for hanging the piñata, 4) paint and decorate, and 5) fill and seal.
You’ll find many variations online on how to make a piñata. But here’s how we constructed ours.
Materials Needed
- Balloon (ours measured 13 inches blown up)
- Paste (flour and water mixture OR Elmer’s Glue and water)
- Paper strips (newspaper is best, but we used printer paper from the recycle bin)
- Marker pen
- Sturdy string for hanging
- Small sharp knife or metal skewer to make two holes for hanging
- Tempera paint
- Crepe paper
- White school glue, such as Elmer’s Glue, for attaching the crepe paper
- A circle cut from cardstock for the center of the flower
- Small treats, such as toys and candy
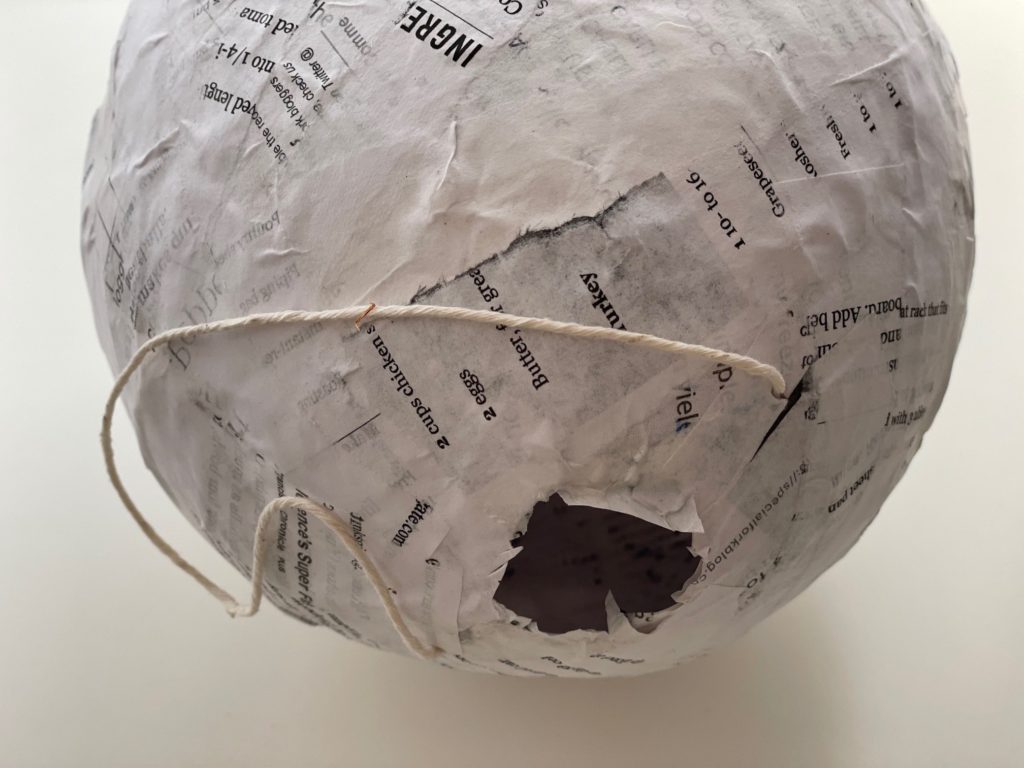
Step 1: Build the Piñata Shell
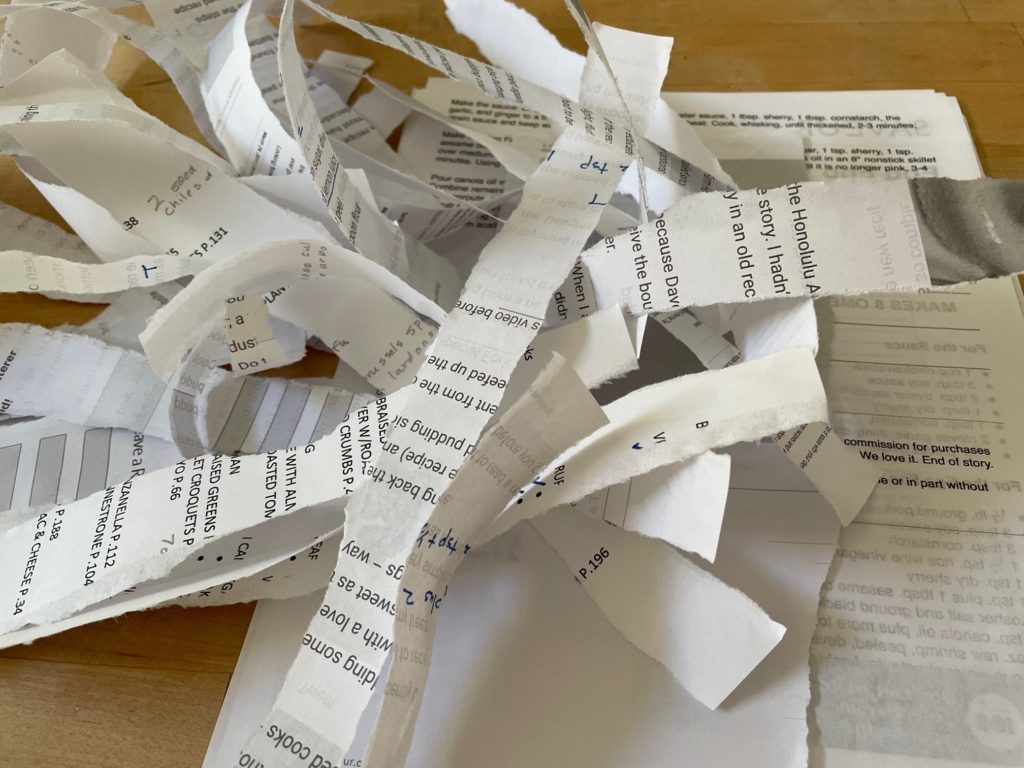
Blow up a balloon and knot the neck. Make your paste mixture. I used one part white school glue (Elmer’s Glue) to two parts water. It’s cheaper to use a paste made with equal parts of flour and water, but I had more than enough glue leftover from making slime.
Tear paper in strips about 1-inch wide . Torn edges ensure a smoother finish, since the thinner edges will blend more easily into the adjoining strips.
Printer paper is thicker and stiffer than newspaper, resulting in a somewhat bumpy surface. Still it’s a good option if you subscribe to your newspapers digitally, as we do. And it certainly doesn’t matter if you plan to cover up the shell with crepe paper, as we did.
Prepare your paste mixture and work outdoors, if you can. This part is messy. Dip paper strips into the paste and use your fingers to remove excess paste. Holding the knot end of the balloon, lay the strips on the balloon, smoothing each strip as you apply it, and overlapping the strips. Leave some space at the knot end–this will be your opening to fill with treats.
We added three layers to our balloon. For the second layer, we tried to lay the strips crosswise from the first set for structural integrity. We started the pasting process early in the Camp Grandma program, giving us a few sessions to work progressively on the completion of our piñata. We dried each layer before adding the next, but you can do two layers at once, allow to dry, then add a third layer.
Rest the ballon on the edge of a bowl that’s smaller than the balloon to hold it in place for drying.
Step 2: Make a Hanger for your Piñata
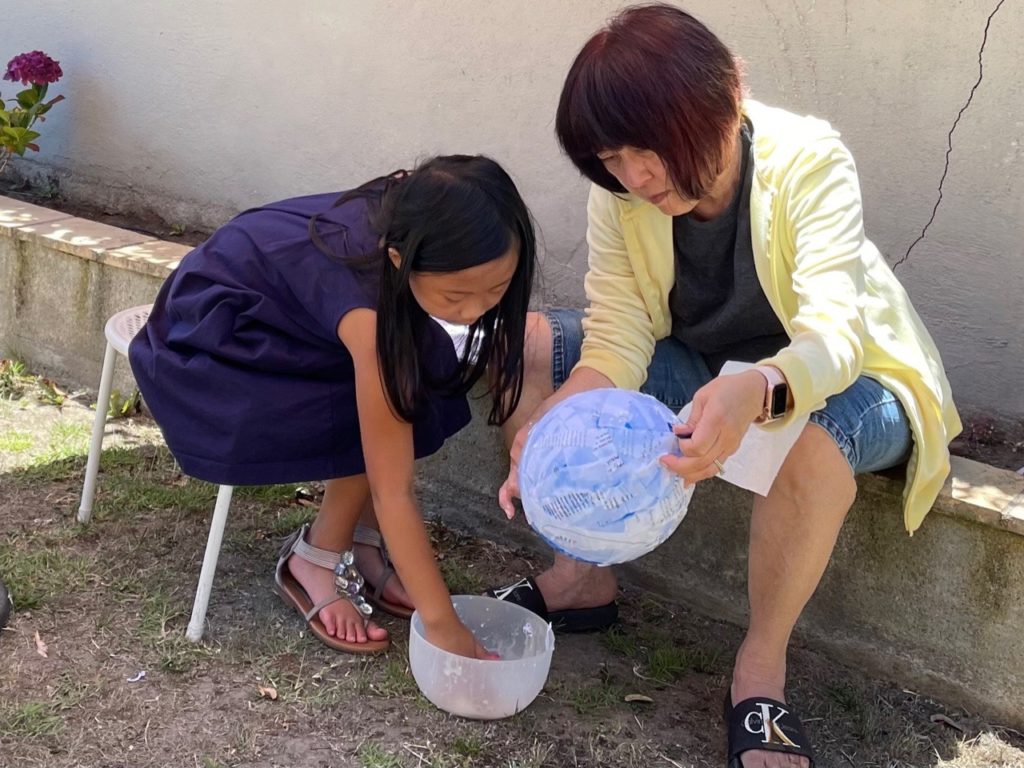
When the paper strips are completely dry, snip the balloon neck to pop the balloon and peel the balloon from the piñata with your fingers. It’s okay if you can’t get the balloon out.
Use an X-ACTO knife or other sharp small-bladed knife or metal skewer to pierce the piñata shell on two opposite ends of the hole you’ve left for filling the piñata. Knot the string, thread through one hole from the inside of the piñata shell; thread the other end of the string through the second hole and knot to the inside of the piñata to secure.
BE VERY CAREFUL when piercing the piñata shell. If your knife can’t get purchase, it can slip and you can cut yourself. Rather than stabbing a hole, try to twist and turn the knife firmly, until the point of the knife breaks through the shell. Then enlarge the hole with a skewer.
Step 3: Decorate your Piñata
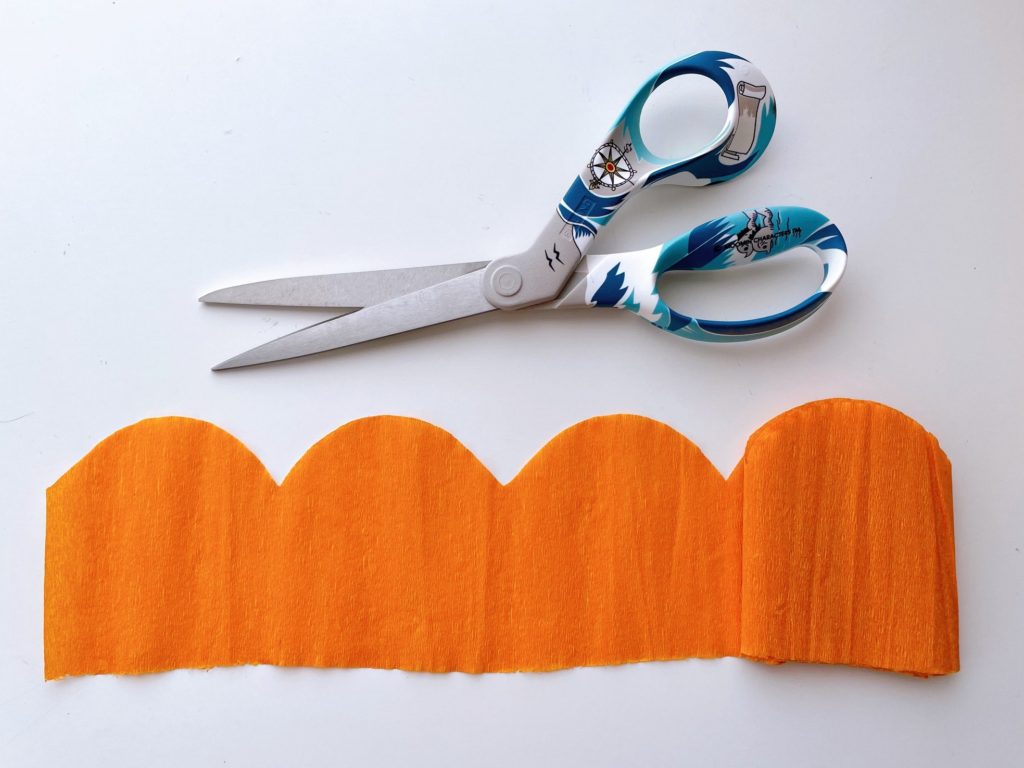
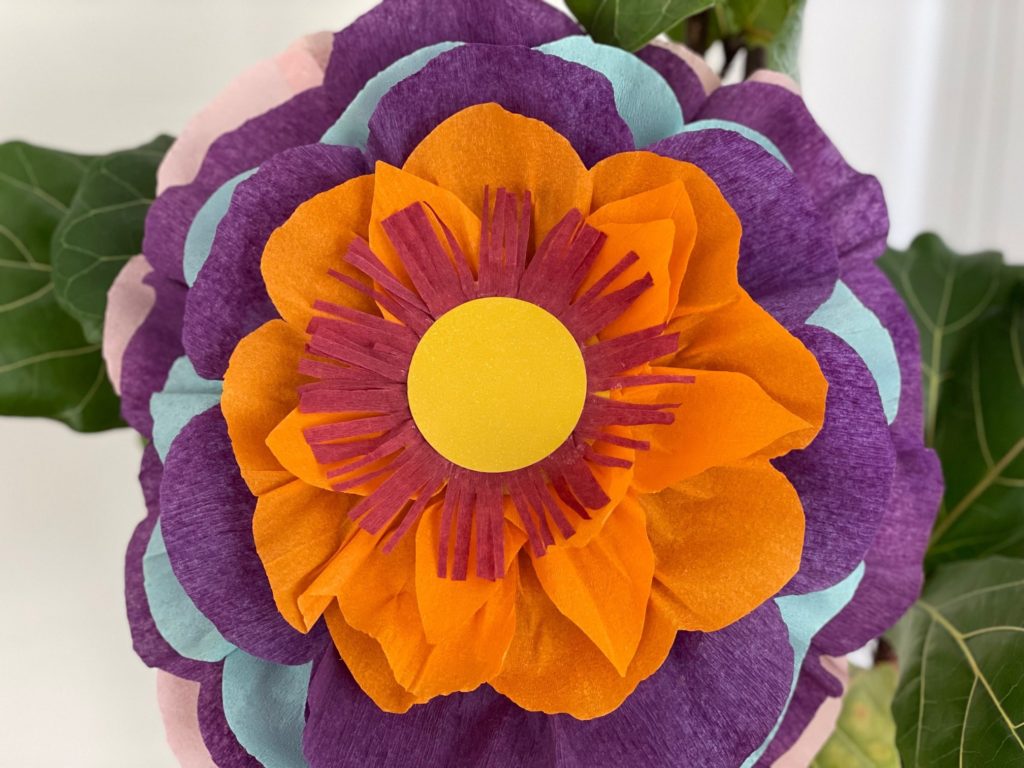
To decorate, we started by painting the piñata green using tempera paint. Then we turned it into a flower by cutting petals from folded strips of crepe paper and adhering each strip with white school glue, gathering the base of the strip while gluing.
Our strips were about 4 inches high, and each petal was about 4 inches wide. You’ll have to cut a sample and see how it works with your balloon.
To give yourself a guide to follow when gluing the petals, use a marker pen to draw a line around the the center of the balloon, not following the equator, but lengthwise, from the north pole to the south pole of your balloon. Our flower will sit on the front half of the piñata only.
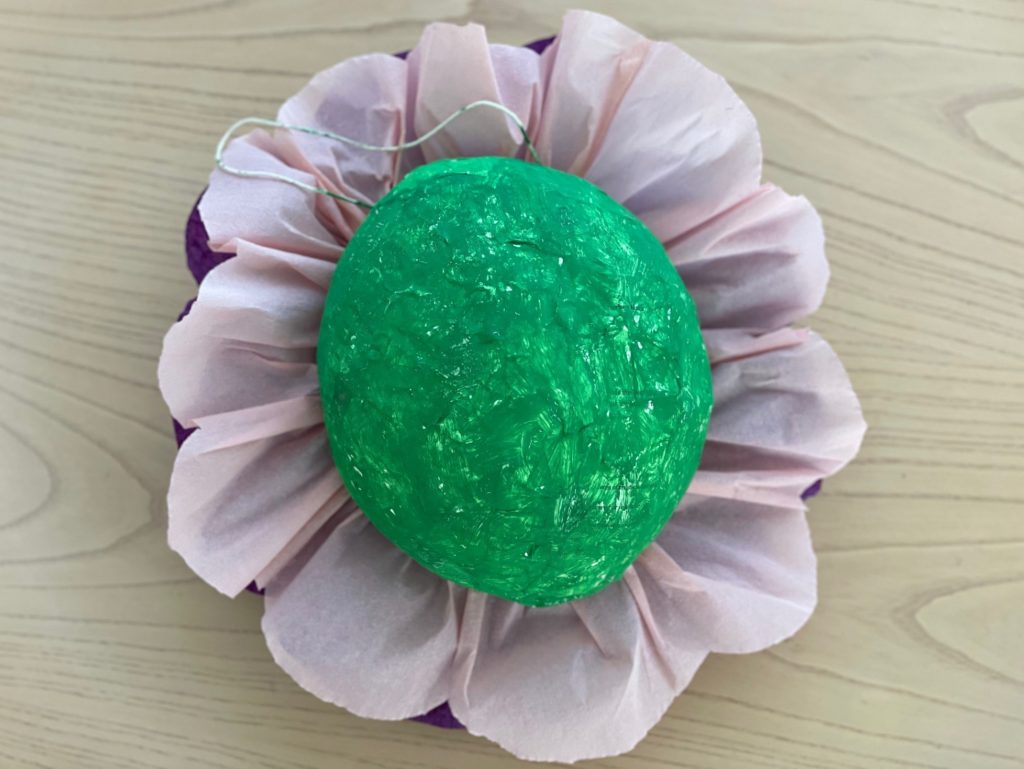
Glue the first strip of petals following the marker pen line as a guide. It’s best to lay down about an inch or two of the white school glue at a time, affix the straight side of the petal strip, then use your fingers to pinch and scrunch the strip to form gathers. You’re starting from the outer (widest) part of the circle, then working your way inwards in concentric circles.
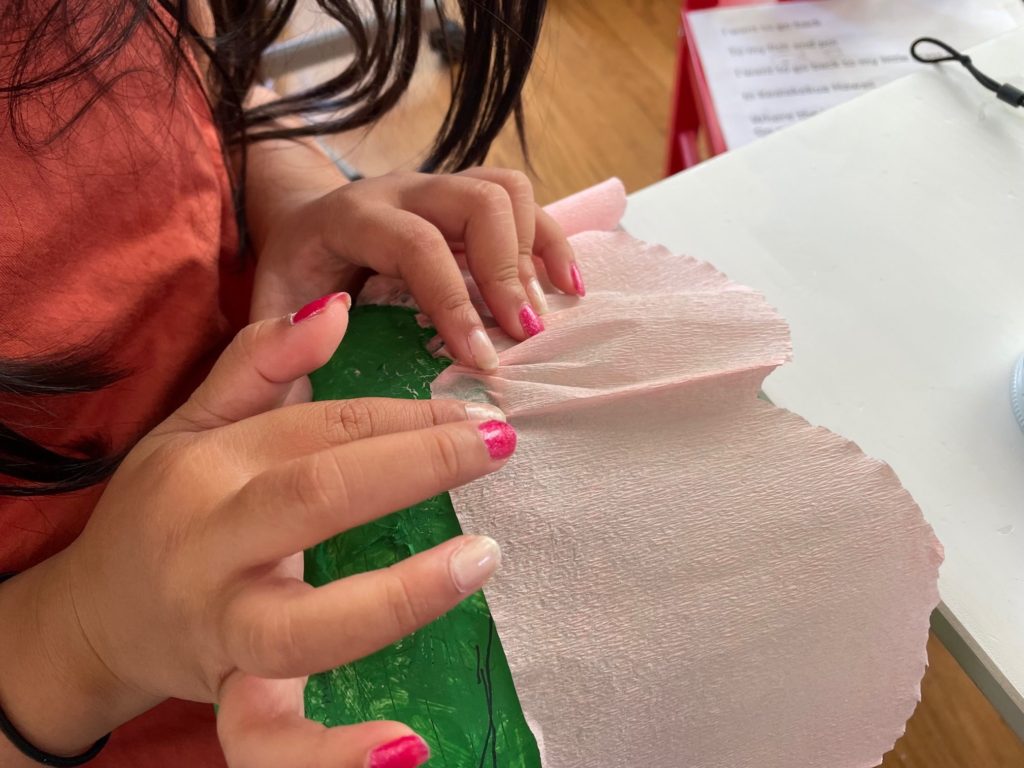
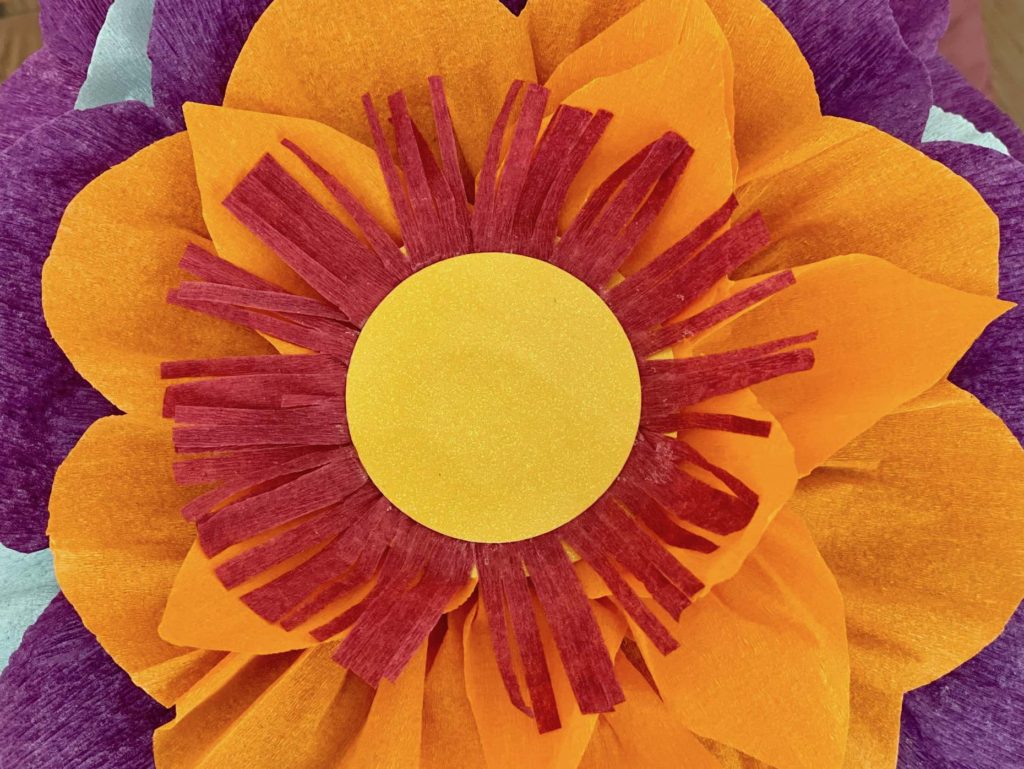
Continue to lay down rows of petals. You can make the petals smaller for each row, or even change the shape of the petals into points. When you get to the center, glue on a cardstock circle to finish.
If you like, glue a contrasting fringe of crepe paper to the cardstock center first, to make the flower “pop.”
You could also add petals to the opposite side of the piñata shell, creating a two-sided flower. We chose the easy way out.
Step 4: Fill and Seal your Piñata
Some people prefer to fill the piñata before decorating, but it seems easier to me to decorate first, then add the trinkets. It’s simpler to manipulate an empty shell while you are decorating. After adding the toys and candy, seal the opening with a few strips of paper, then paint over the sealed part.
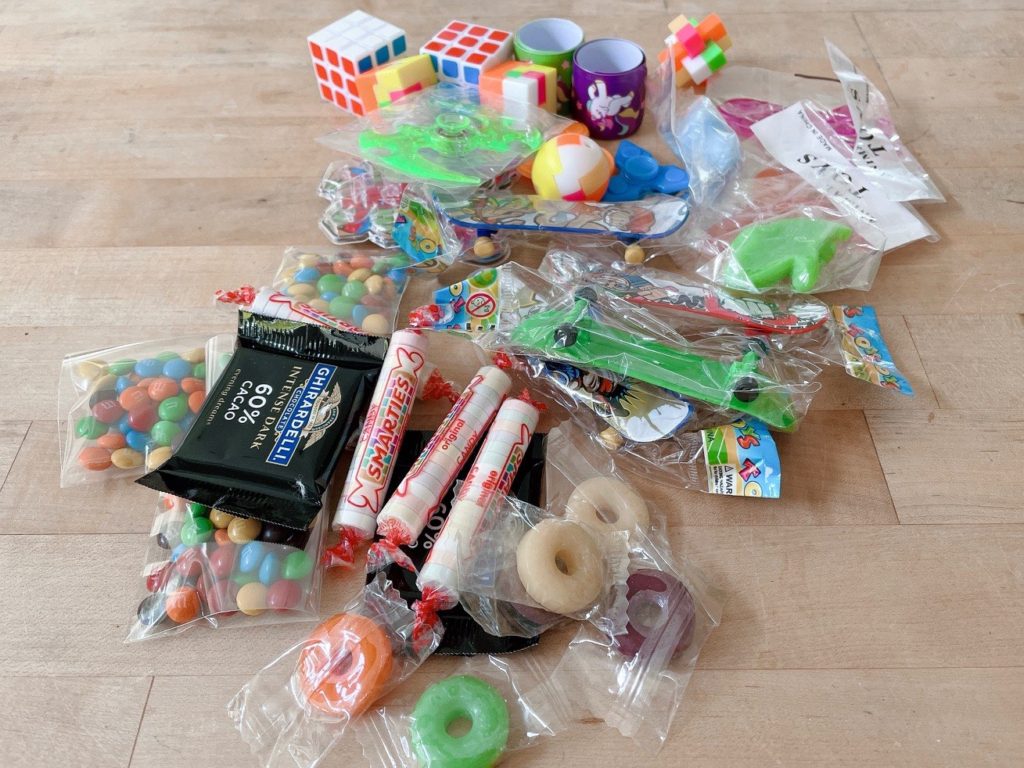
I don’t like to give the kids a lot of candy, so there is only a small handful, including M&Ms left over from birthday cupcake decorations, that I sealed in small, food-safe cellophane bags. The kids like Lifesavers, so I added some that are individually wrapped, rather than give them whole packs.
Our celebration will also include brownies, ice cream, and other snacks, so there will be plenty of sweets without filling the piñata with them.
The requisite cheap toys were purchased from Amazon.
A Cautionary Note
Our piñata was difficult to break–three layers of printer paper results in quite a strong surface. You don’t want your piñata to break apart at the first blow, but you don’t want it to take endless hits to crack open, either. I might try two layers of printer paper or three layers of newspaper next time.
How to Make a Carnival Game
Last year, we had an end-of-school outdoor celebration in our backyard because the children’s school, like most others, had been closed due to COVID. So, they were missing out on the year-end carnival that was a school tradition.
This year, the kids were in school all year, but there was no end-of-school party again, for safety reasons. So a Camp Grandma blow-out party seemed like a good idea.
We’ll need more fun activities beyond breaking a piñata, to create a carnival atmosphere.
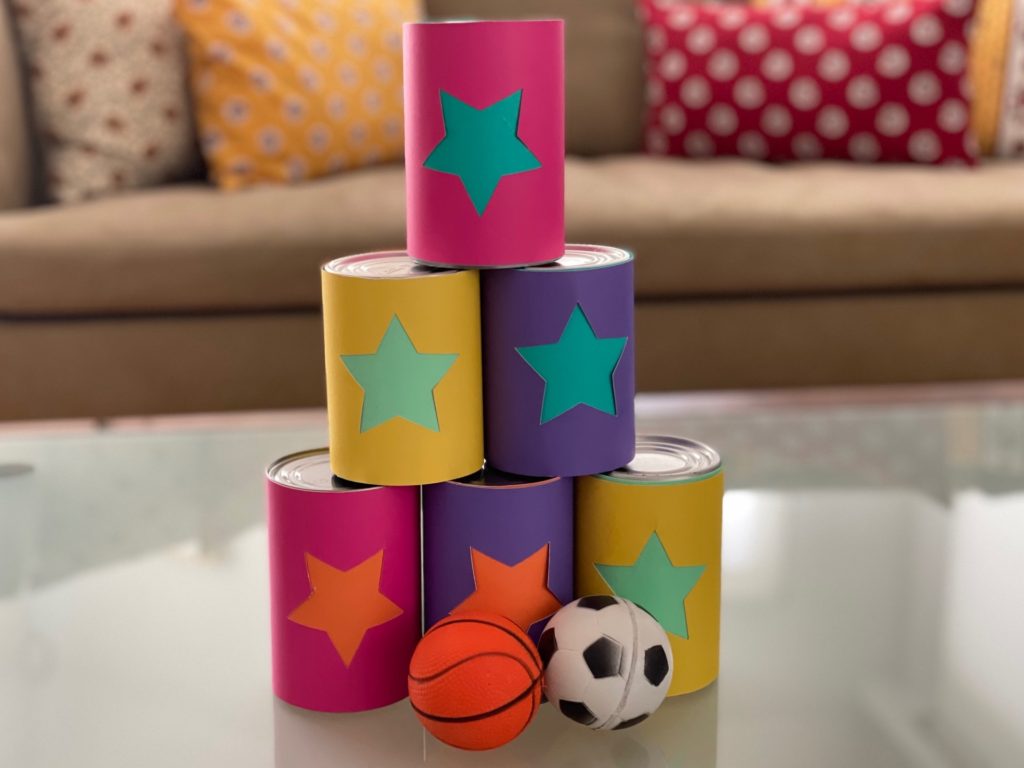
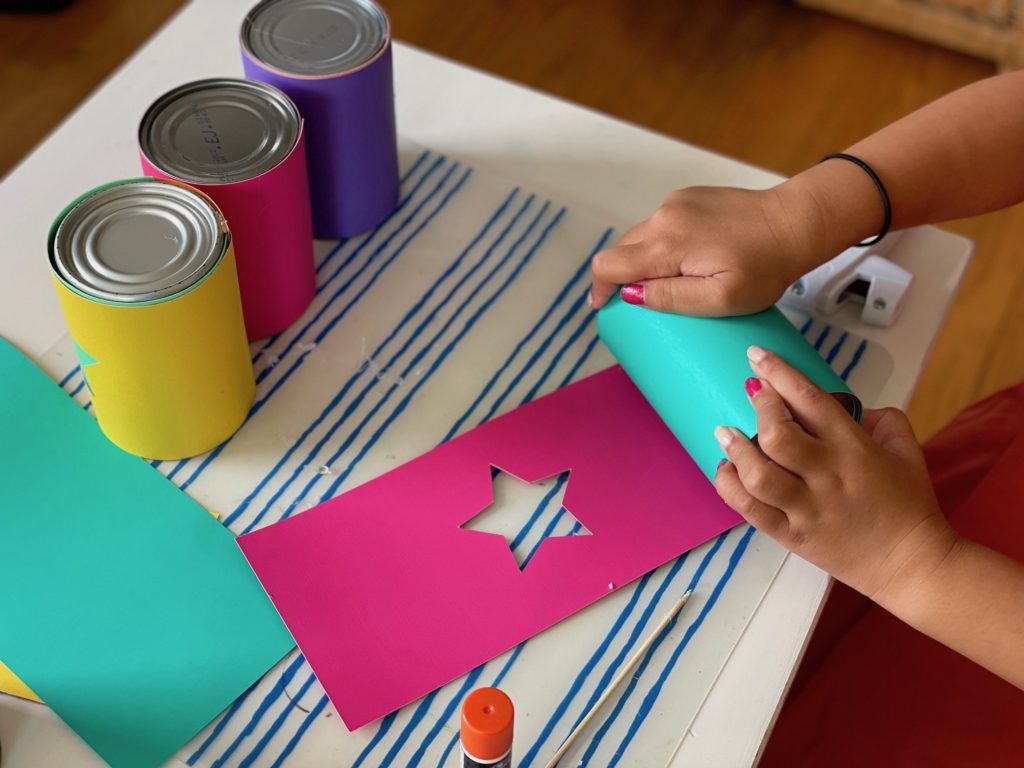
I saw this knock-the-cans carnival can game on Cricut that I thought the kids would enjoy. Miss T and I made it using the cutting machine. But you can simply cover cans with bright-colored cardstock or patterned paper, omitting the star. Use a glue gun to secure the cardstock to the can.
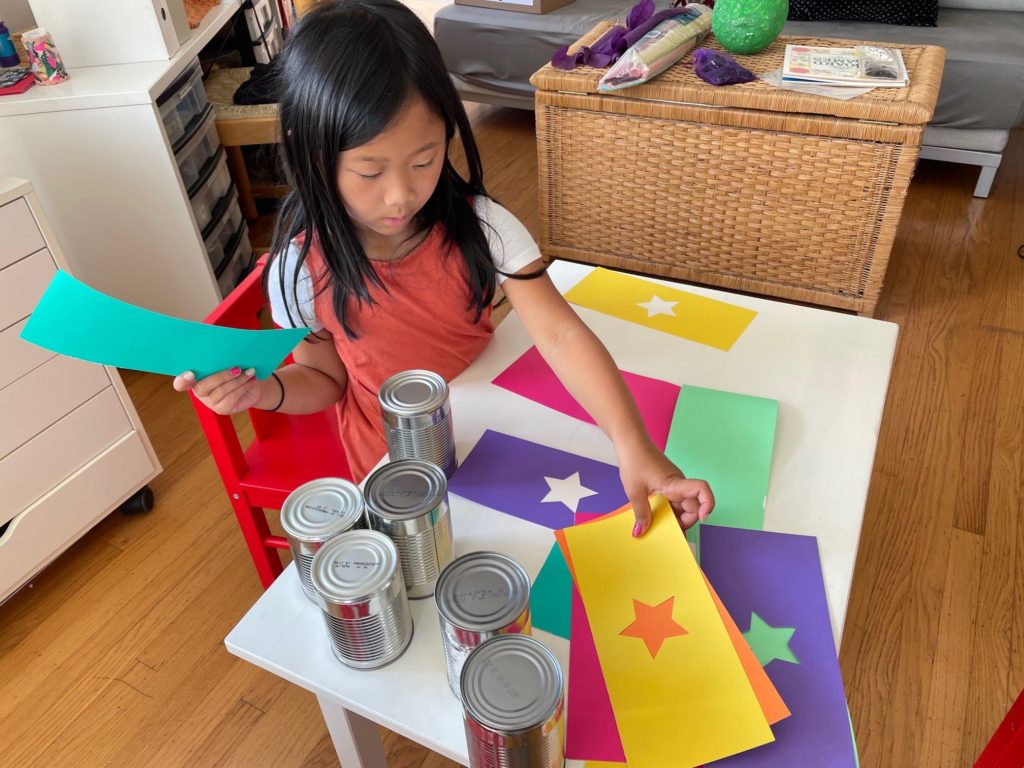
If the cardstock isn’t glued evenly, so it’s flush at top and bottom, the cans won’t sit securely as you stack them. You can remedy this by trimming the overhang with small, sharp scissors.
How to Make Bean Bags
We’ll need bean bags for some of our games on Sunday, so Miss T got to work making them. These are three inches square, made with felt, and filled with rice. Here’s how to make the bean bags.
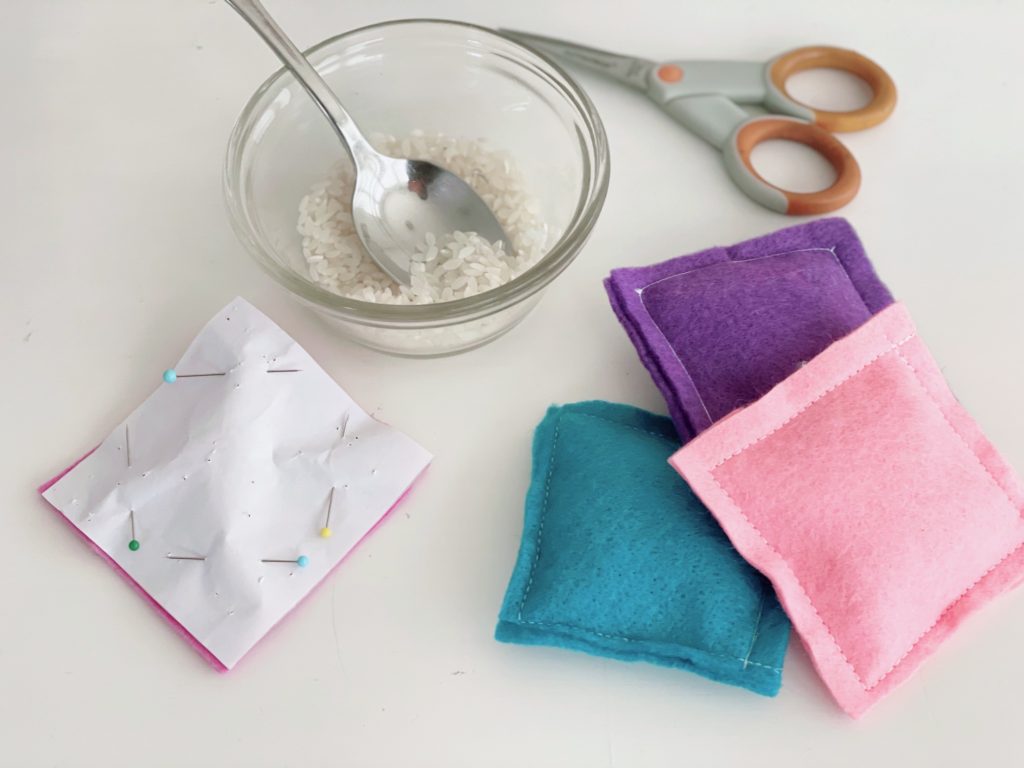
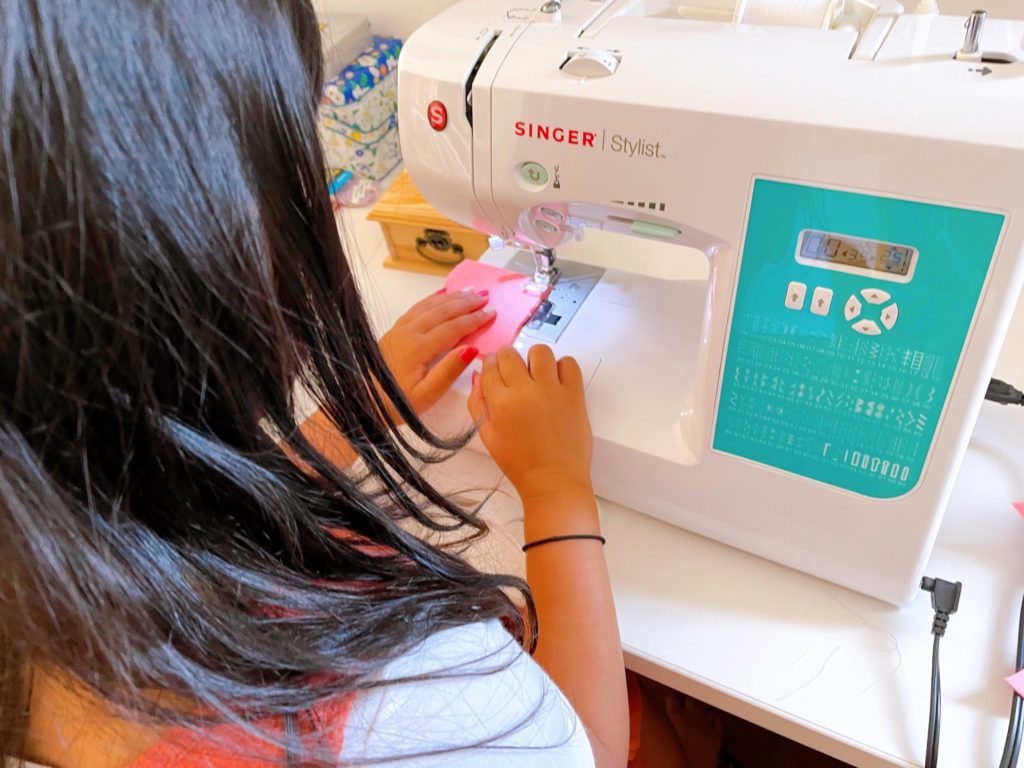
At eight years old, Miss T has been to two summer sewing classes so she knows how to sew. I had her create a pattern by using a ruler to draw a three-inch square on paper. She cut out the paper square, then pinned it to felt, to cut out her bean bags.
She stitched three sides of the felt and filled the bean bags with rice. Then, I stitched the remaining side closed because it’s much more difficult for a child to sew a seam on a bag stuffed with rice.
News from Camp Grandma
Next week, I’ll report back on our Camp Grandma party, sharing tips for games, food, activities, and decorations. If you missed any of our six Camp Grandma sessions, they’re archived at the end of this Camp Grandma post.
.
Don’t forget to sign up for my email newsletter! Every Wednesday, I’ll give you a new idea for an activity or insight to nurture the little ones in your life. Come visit!
Quite a production. Looking forward to next week’s post on the end of camp celebration