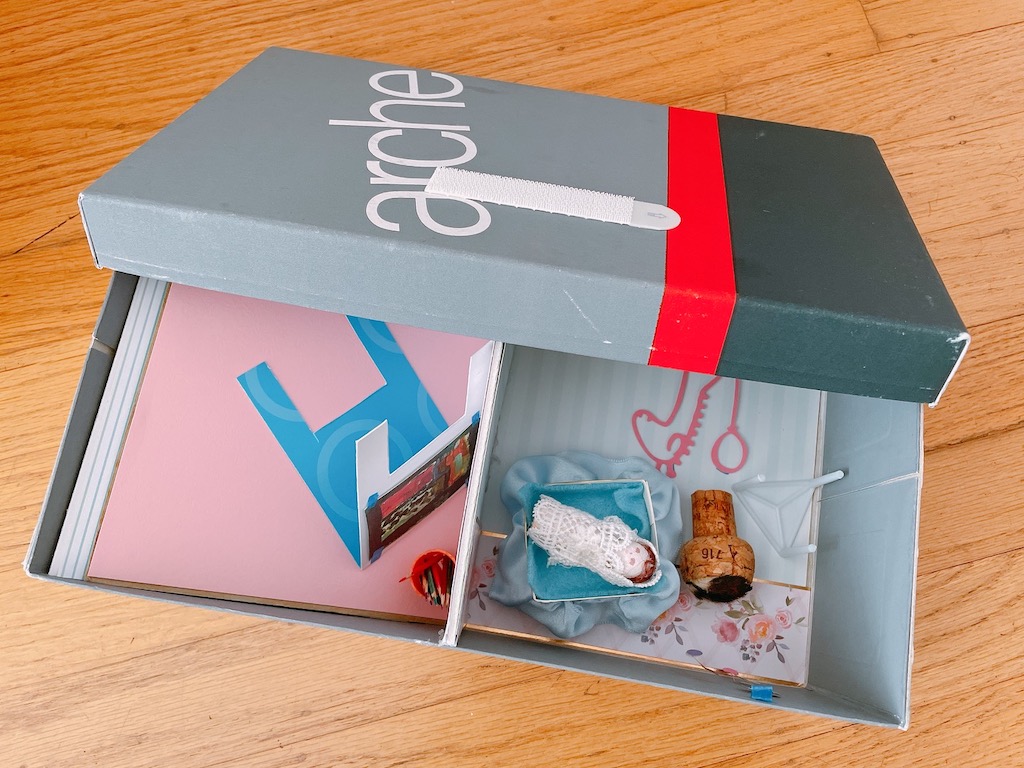
How to Make a DIY Dollhouse from Shoe Boxes
Last February, when we were in lockdown, Miss T and I made clothespin dolls over FaceTime. Next we worked on a dollhouse made of boxes.
Recently, I opened the dollhouse boxes wondering if it was time to toss them. Then I realized we hadn’t made a true dollhouse. The rooms were of different sizes and unconnected. We’d made vignettes.
So, I asked Miss T if she’d like to give it another go.
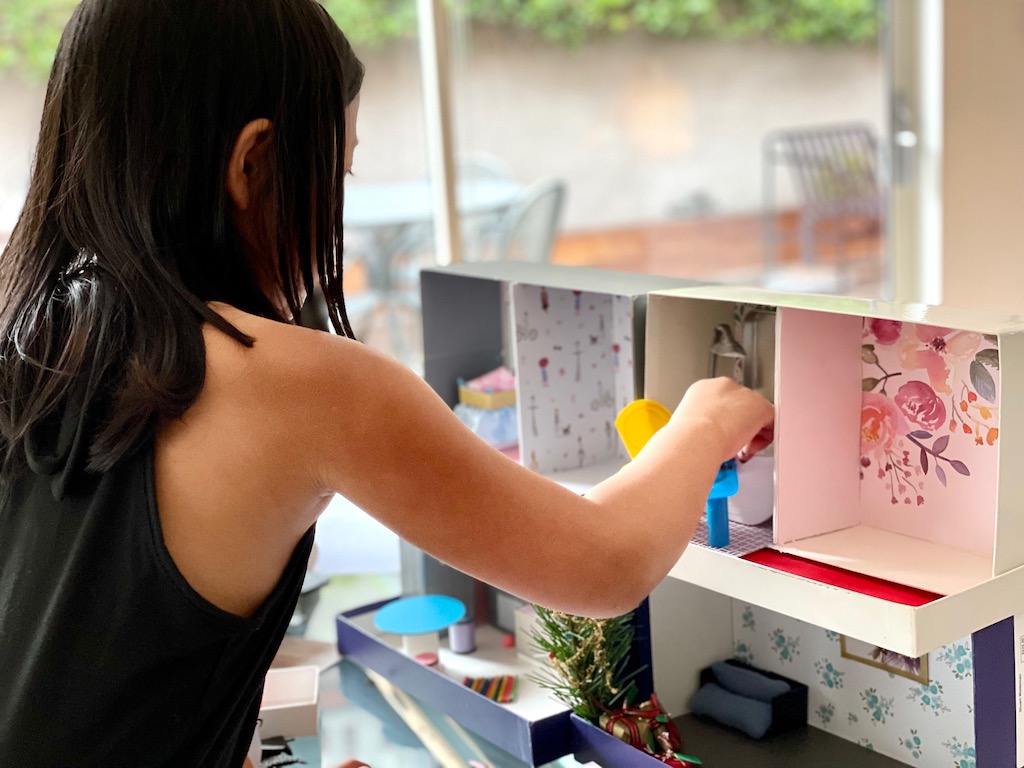
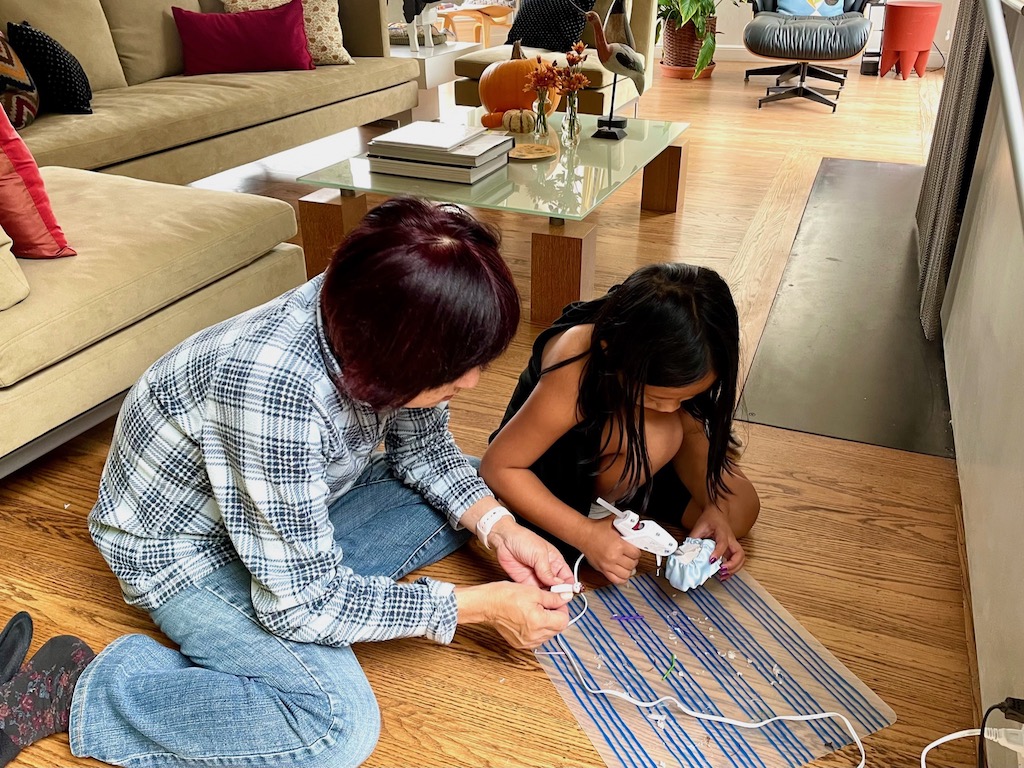
On Saturday, we built a proper dollhouse from four shoeboxes. We spent all afternoon companionably on its construction; then an hour playing with the clothespin dolls. All together, five lovely hours of quality time.
Ground Rules for the DIY Dollhouse
We could have bought furniture and accessories for our dollhouse, but that was not my purpose. Instead, we challenged ourselves to turn discarded items into furnishings, using small boxes, pizza “tables,” glue stick caps, empty thread spools, and other odds and ends destined for the trash bin.
Similarly, while we could sculpt furniture with polymer clay (such as Sculpey) to create chairs and anything else we wanted, I didn’t allow this either, except for small accessories like cups, plates, food, and whisks.
My goal was to teach Miss T to create and use her imagination, instead of relying passively on what was already available for purchase.
Construction Considerations
A dollhouse, even one made of shoeboxes, takes a lot of space. We needed to design a house that would be collapsible so we could put it away after play.
Here’s how we did it:
- Anything glued into the shoebox could not extend beyond the edge of the shoebox, so that the box could be covered and put away. This meant that the interior walls would only divide the rooms partway.
- The floor of the rooms were not glued down; this way, they could be removed and put away in the shoebox when it was time to clean up.
- We needed a way to connect the boxes for play; yet be able to separate them afterwards. Use adhesive-backed, heavy-duty, hook-and-loop strips between boxes from side to side, then top to bottom. I used Command large picture hanging strips since I had them on hand, but I might try Velcro Heavy Duty Strips the next time.

Materials Needed for the DIY Dollhouse
- 4 shoe boxes of similar size
- Adhesive-backed, heavy-duty, hook-and-loop strips, such as Velcro or Command
- Foamcore board to make the walls between rooms
- Cardboard for floors
- Decorative cardstock in solids and patterns for walls and floors (12X12 inches)
- Assorted discarded items such as boxes, spools, empty dental floss containers, etc., to make furniture and accessories
Tools Needed for the DIY Dollhouse
- Sharp scissors
- Matte knife and/or large paper cutter
- Glue stick
- Glue gun
- Ruler
- Pencil for marking cutting lines
- Blue painter’s tape for holding things in place
- Silver duct tape for when you want a metallic look
Start the Project
Here are the basic steps to make your dollhouse.
- Gather all materials and tools.
- Using the hook-and-loop strips, adhere them to the shoeboxes to secure them in place so the boxes are attached, side to side for each floor, then top to bottom to connect the first and second floor shoeboxes.
- Now separate the boxes so you can work with each one separately.
- Determine what types of rooms you want in your house and lay out where each room will be.
- Measure and cut interior walls from foamcore boards. Do not extend the walls beyond the edge of the shoebox; set aside.
- Now the fun part: Decide on the cardstock to use for the floor and walls, considering pattern and color. You are your own interior designer.
- Cut the cardstock for the walls to fit the back of the shoebox and glue in place with a glue stick.
- Now cut cardstock for the interior walls (the foamcore walls you had set aside), and glue to the foamcore with a glue stick.
- Glue the foamcore wall into the shoebox with a glue gun to create the room partitions.
- Cut cardboard for the floors.
- Then cut cardstock to cover the cardboard floors.
- Glue cardstock to the cardboard with a glue stick; do not glue the floor into the shoebox; just lay it down so it can be removed later.
- Now you have rooms.
- Stack the shoeboxes and press the hook-and-loop strips to hold the boxes in place.
- Make furniture to furnish the rooms. See ideas here.
- When you’re done with play, gently coax apart the hook-and-loop strips, remove the cardboard floors and put them back into the box, along with the furnishings, and cover with the lids.
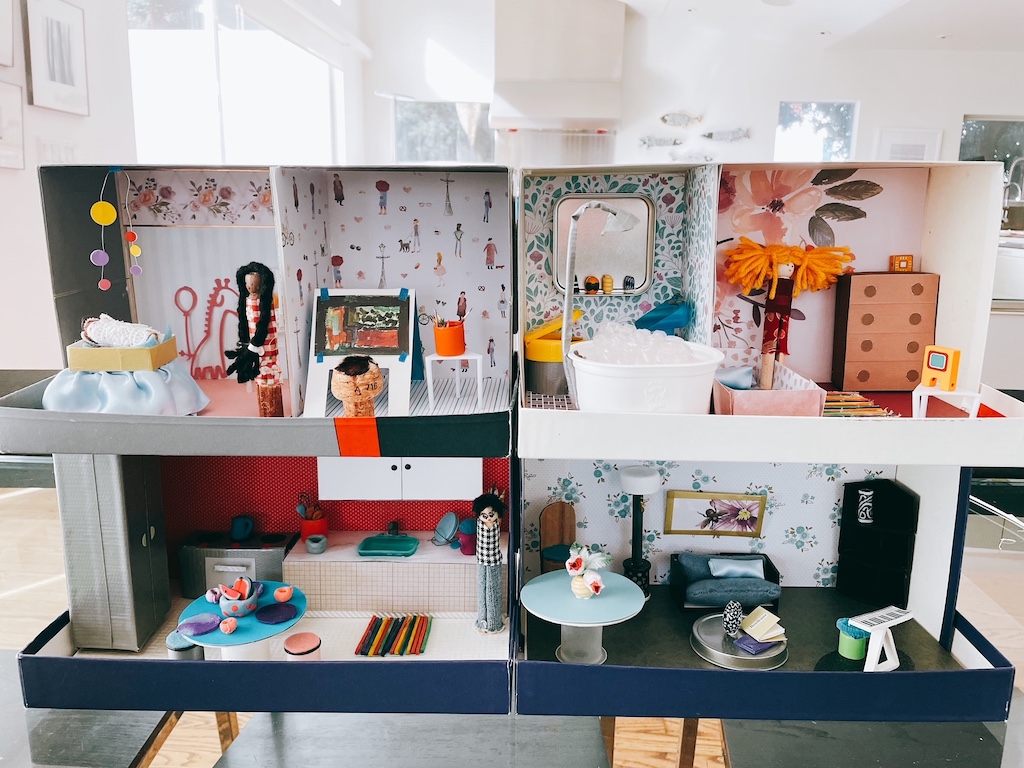
Rooms and Furnishings
Here’s a look at our rooms and how we furnished them.
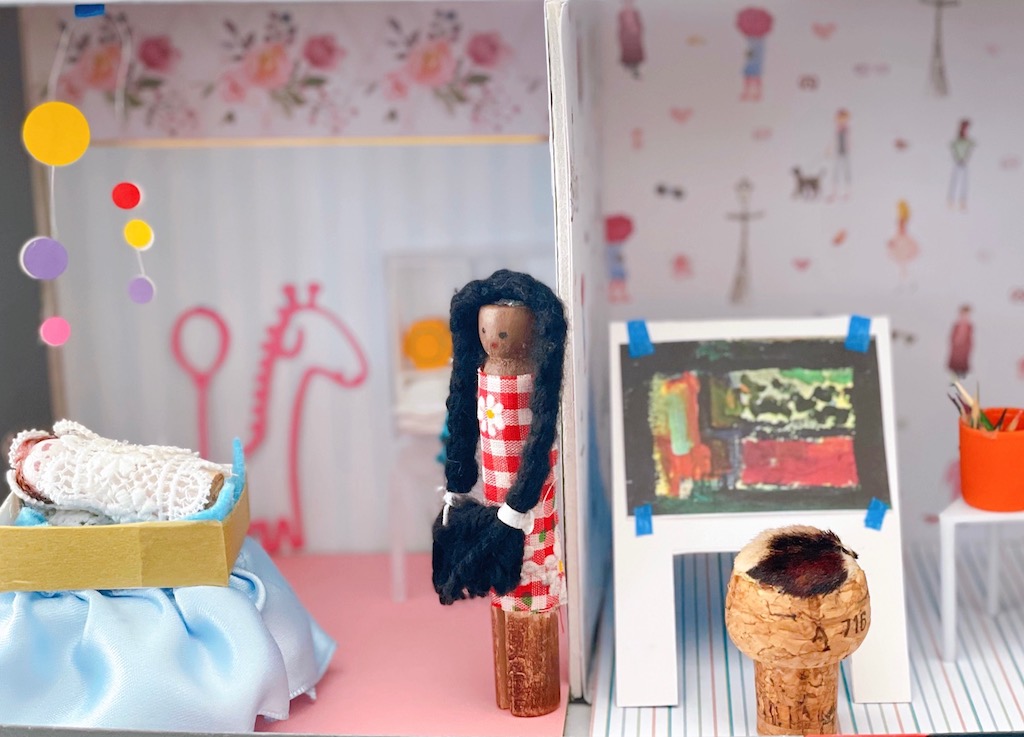
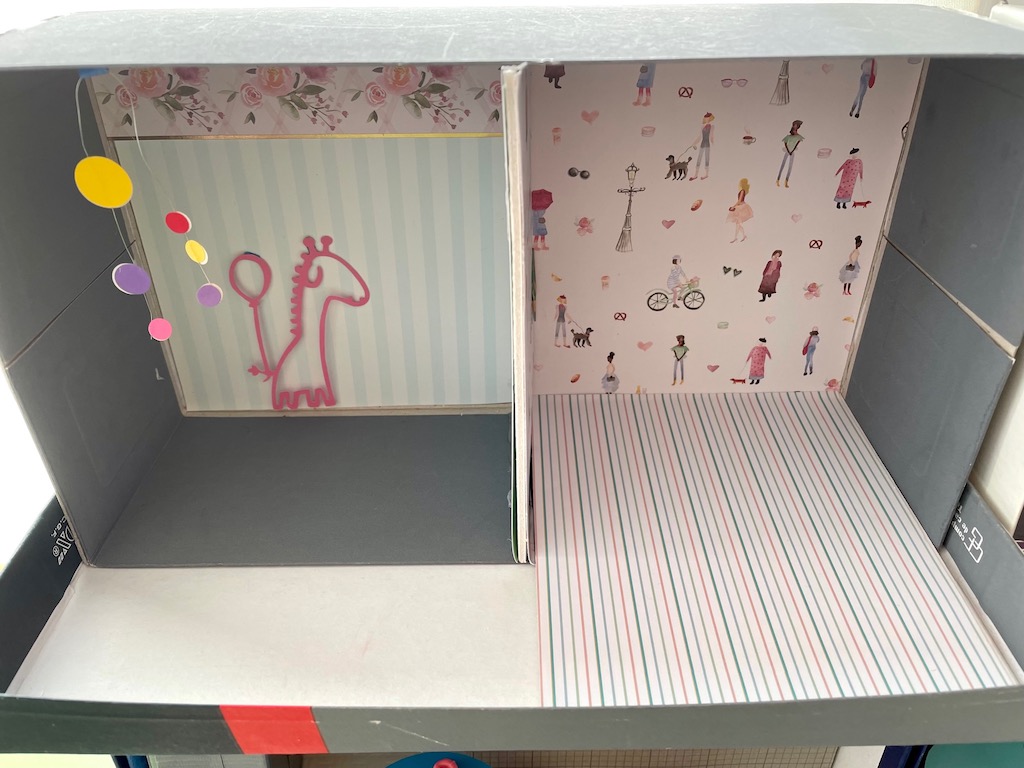
Nursery and Art Studio
- Make the bassinet base by gathering satin wired ribbon around a small box; hot-glue in place. For the bed, glue on an open box wrapped in washi tape.
- To make the mobile, attach small circle stickers onto very thin wire and secure to the ceiling with a bit of blue painter’s tape. The giraffe is a cutout using a Cricut cutting machine, that I had left over from a project.
- You can make a changing table for baby. Use a pizza “table,” topped with a narrow plastic box and paper shelves. Stuff with diapers made from folded toilet paper cut into small rectangles.
- Create the art studio easel by folding a piece of cardboard and snipping out legs. For an artist’s stool, use a champagne cork. We covered ours with a bit of fake fur for the seat.
- Fashion the artist’s colored pencils from toothpicks with the tips colored with markers; collect them in a glue stick cap.
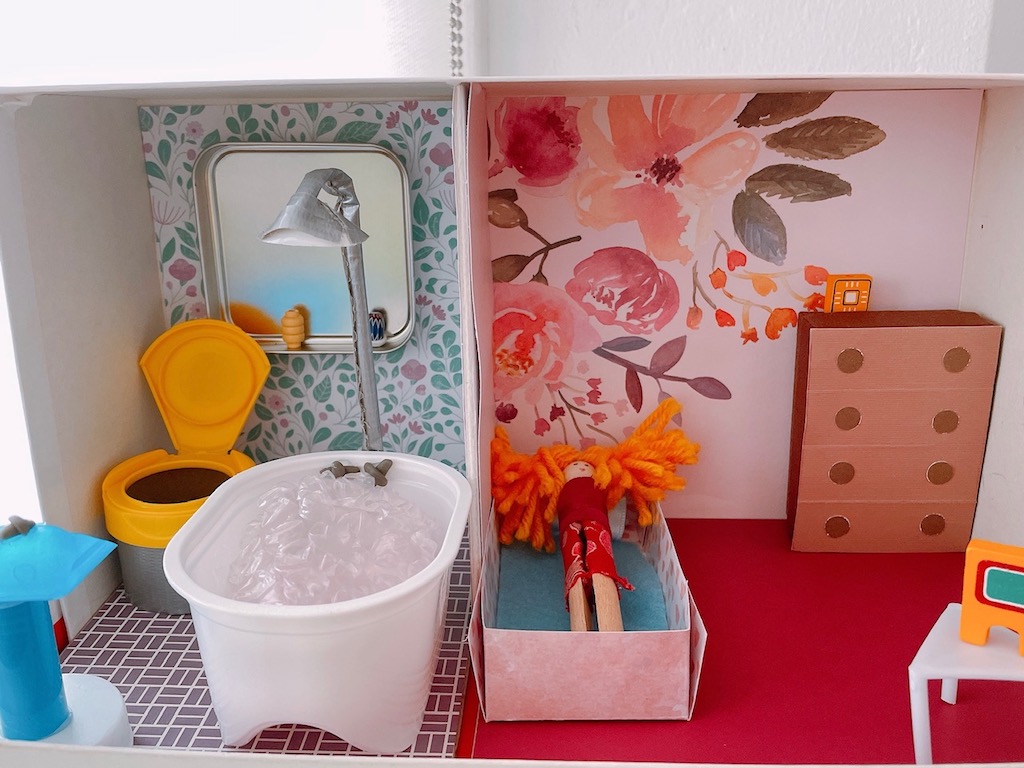
Bathroom and Bedroom
- Use a Pringles snack container for the tub (Miss T’s brilliant find!). To make the shower pipe, cover a pipe cleaner in duct tape; use a GUM dental floss cap for the shower head. Make bubbles in the bathtub by crumpling up a bit of bubble wrap. You can make levers on the tub from polymer clay.
- Take a flip-top cap from a large bottle of Kirkland calcium pills and sit it on a few inches of toilet paper roll covered in duct tape to make the toilet.
- Construct a sink using a Glide dental floss cap glued to a marking pen cap, with a small plastic cap for the base. Make the faucet fixtures from polymer clay.
- Make a mirror from a tea tin lid and add wood beads for cosmetic bottles.
- Create a bed by folding cardstock into a box.
- For a dresser, stand up a small box; for drawers, fold cardstock in fourths to give the impression of drawers and use hole punch circles for the drawer pulls.
- I happened to have on hand wood beads that looked like a clock and a small TV; although we were trying to make everything from discards, I thought it was fair to use them, since they were not being used for their intended purpose.
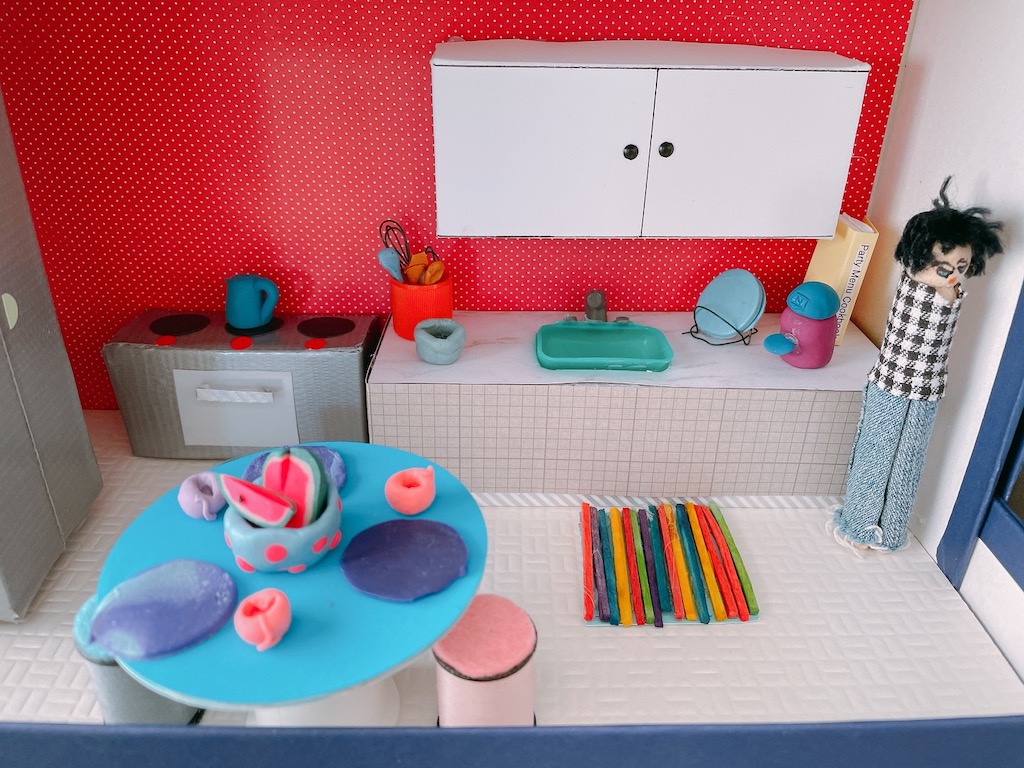
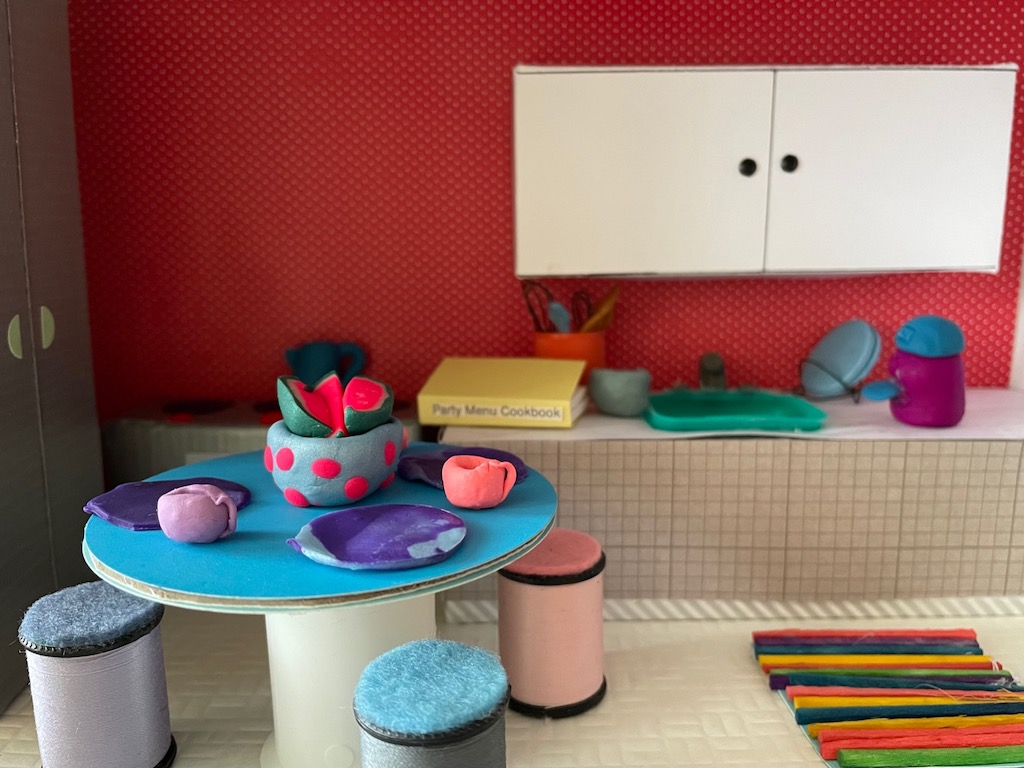
The Kitchen
- Duct tape is wonderful for creating your own “stainless steel” appliances out of boxes.
- To make a table, glue a large empty thread spool to a cardboard circle. I turned unused spools into stools by gluing on a matching felt circle for the seat. (One day, I’ll reclaim them for sewing.)
- You can fashion kitchen cabinets from cardboard boxes; use small pronged fasteners for pulls.
- I happened to find a slab of firm Styrofoam that was used as packing material that was the perfect size for the counter. I dug out an appropriate-size hole and embedded a Glide dental floss cap into it for the sink. Then I covered the Styrofoam with cardstock glued in place with a glue gun.
- Miss T made the plates, cups, tea kettle, watermelon and Nespresso machine from polymer clay.
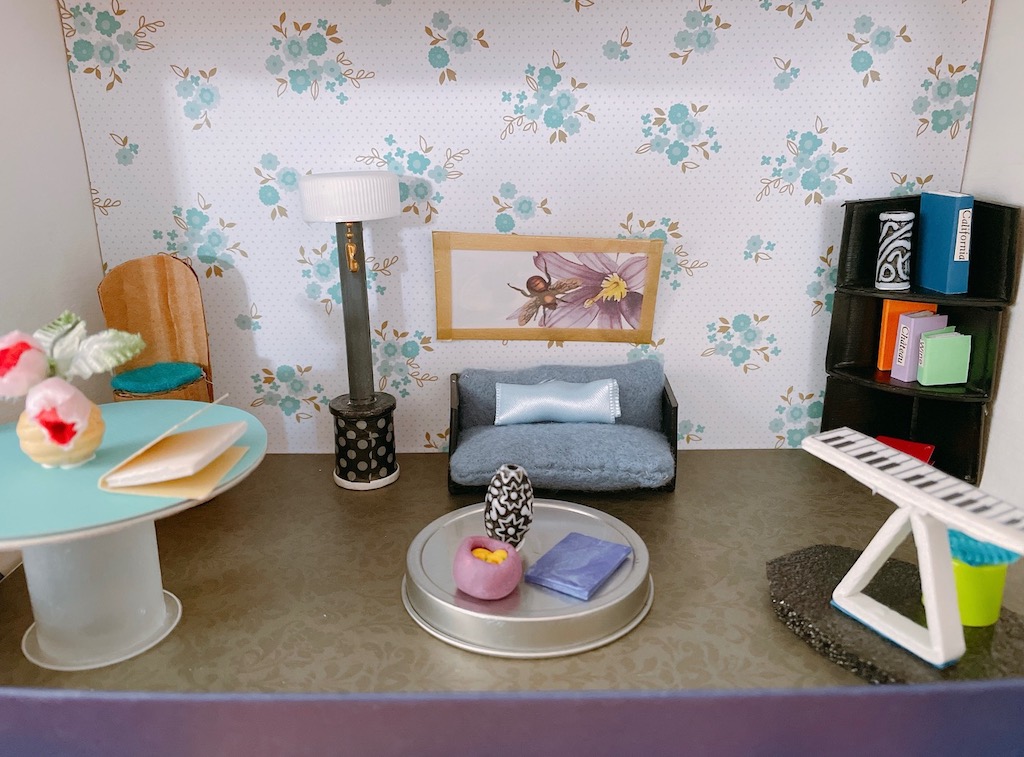
The Living Room
- When our pizza delivery came with black plastic corners instead of the typical “table,” I knew they would make great bookshelves if I stacked and glued them together.
- We filled the bookshelves with books made by covering squares of foamcore board with cardstock book covers; the black-and-white vase is a bead.
- I took two of the plastic corners and turned them into a sofa, stitching felt upholstery. It’s a little small in scale for the room; we need to find a way to make a sofa of a more appropriate size.
- Miss T had the keyboard–just printed on paper–so we cut it out and made a foamcore stand. Since it was rather wobbly, Miss T cut out a black mat from a Styrofoam sheet and glued the keyboard onto it. We made a stool from a glue stick cap with a coiled pipe cleaner as a cushion.
- To fashion the lamp, use a spool wrapped in washi tape, as a base. Insert a crayon into the hole of the spool and glue on a plastic cap for the lamp shade. The light pull is a bit of chain.
- You can make a chair by rolling up a strip of cardboard, then adding the chair back and a felt circle for the seat.
- We made this table from a ribbon spool; the vase for the flowers is a wooden bead.
When play is done, it’s easy to take the house apart and pack everything back into the boxes.
What Kids Learn from this DIY Dollhouse Project
This was a fun project that took time to produce but will continue to provide hours of fun as we rearrange the furniture and play with the dolls. Little N wanted his own boy doll, so I made him one with jeans and a check shirt.
Come holiday time, we have a Christmas tree and presents that we can add to our house. And we’ll continue to edit and refine our furnishings, and possibly extend the family with more clothespin dolls.

Miss T is not a doll person and the age-appropriate dolls I’ve bought her–a Bitty Baby when she was a toddler and the Emerson Wellie Wisher doll when she was a little older–hardly held her interest for long. She seems to prefer to play with the most modest clothespin dolls that we’ve made, along with the recycled shoebox house that we’ve built together.
It’s just as well, because there’s so much she can learn from our project:
- Most of all, how to unleash her imagination to see everyday objects in a different light.
- How to recycle trash into useful new objects.
- An opportunity to develop planning and organizational skills as she creates interior spaces. For example, the art workshop was her idea.
- Experimenting with colors and patterns to create a harmonious whole.
- Continuing to refine her already-excellent fine motor skills.
And it has resulted in a happy Saturday afternoon between grandma and grandchild, building something special together.
.
Don’t forget to sign up for my email newsletter! Every Wednesday, I’ll give you a new idea for an activity or insight to nurture the little ones in your life. Come visit!
Sandy — this is the BEST ever project. The creativity, and the making-something-with-what-you- have is so important. I can’t wait to do this with our little Amalia in a few years.
Thank you, Rosemary! I know you will have the best time doing projects with your grandchild. Kids have so much these days, it’s good to challenge them to be creative with less. : )