Make a Kid-Friendly Pumpkin Pillow from Scraps
Looking back over five years of blogging, I can add more input to previous posts with the advantage of hindsight and experience.
Today, we’re revisiting the time I made cute tabletop pumpkins from old socks.

Recently, I used the same technique to make a larger pumpkin pillow. I’ve added the instructions to the original pumpkin post. The grandkids love this pillow because it’s soft and plump and something to cuddle when lying on the sofa or reading a book. It also makes a good indoor ball.

What you Need to Make a Pumpkin Pillow
I made my pumpkin pillow entirely with materials I had on hand: a yard of velveteen remnant bought on sale years ago, leftover yarn, and brown felt scraps.
For the stuffing, I used the innards of a bed pillow that I had planned to toss. Pillows these days are usually made with fiberfill shaped in the form of a pillow. You’ll have to pull out tufts to fluff up and reshape. You may want to make it with new polyester fiberfill; I chose to work with what I already had on hand.
I’d love to have a few pumpkin pillows in different colors, patterns, and sizes for my sofa.
The Challenge of Making a Pumpkin Pillow
Making tabletop pumpkins was easy because a sock is already tubular, so you just need to snip off both ends of the sock and gather top and bottom with a simple running stitch. Being small, it’s also easier to manipulate than something that’s pillow size.
The little pumpkins are stuffed with a some rice to weight them, and then with polyester fiberfill. The stuffed sock becomes a pumpkin when you tie heavy thread around it, to make bulges that give the stuffed sock a pumpkin shape. For a pumpkin pillow, you’ll want to use something thicker to tie, like yarn.
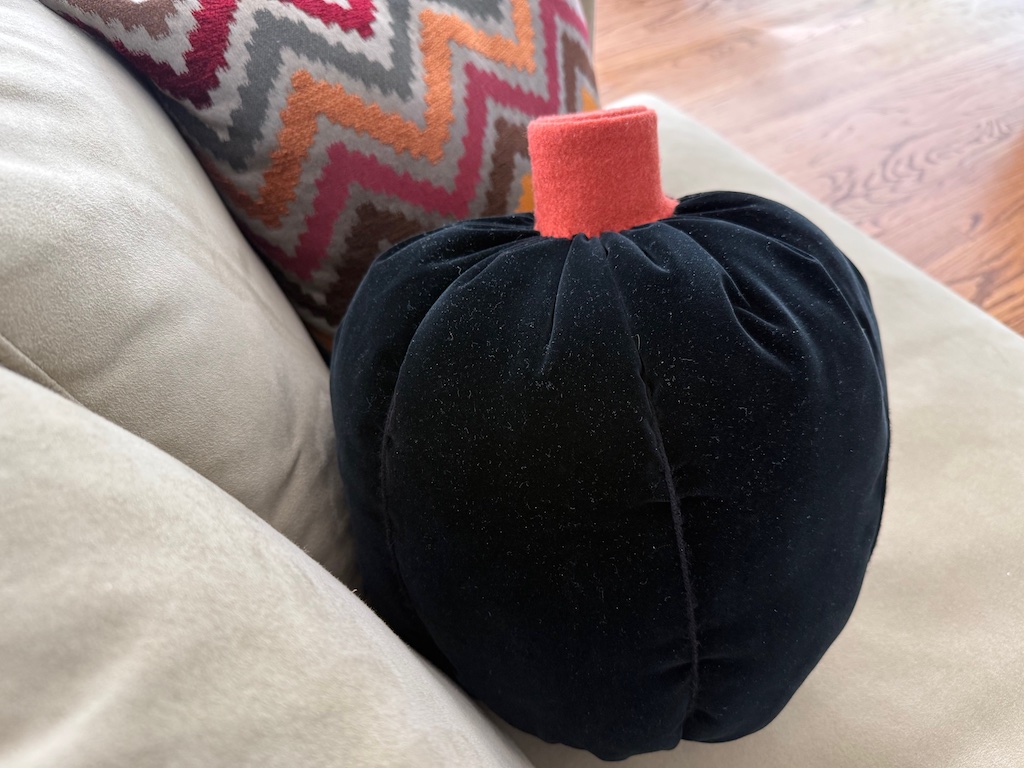
The biggest challenge was to find some way to create a three-dimensional pumpkin stem. I hit on the idea of rolling up a felt strip, holding it together with white school glue, and stitching the rolled strip to the pumpkin. It was quite satisfactory!
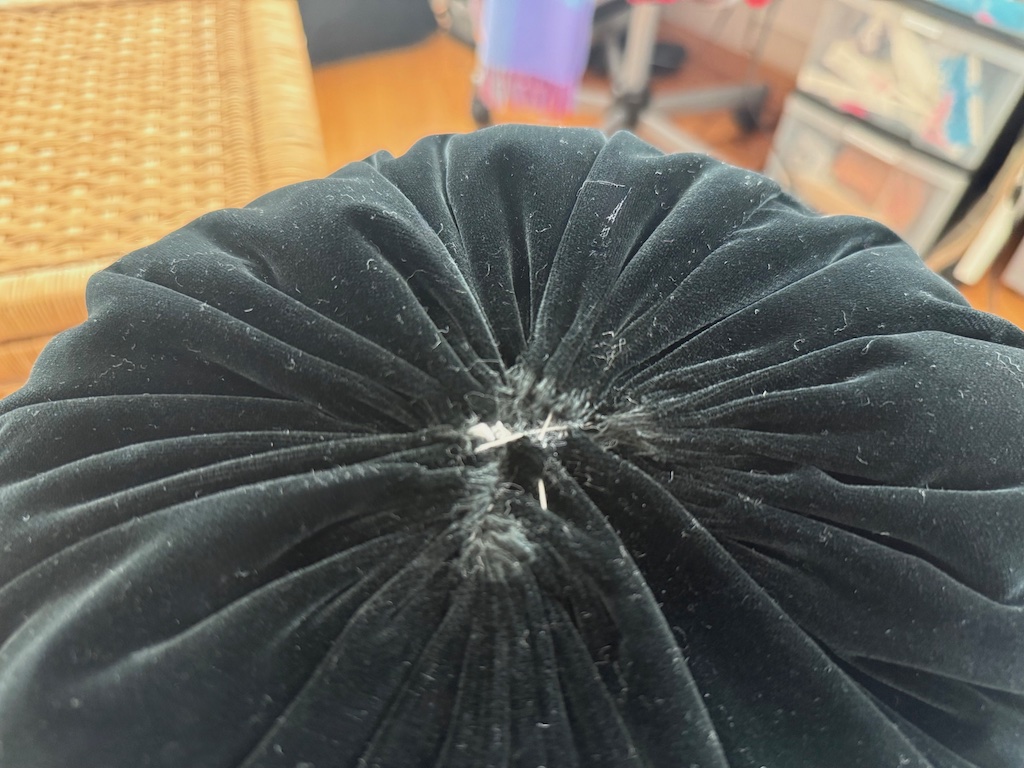
The second challenge was in gathering the fabric to close the top and bottom of the pumpkin. Unlike the socks, a pumpkin pillow has a lot more fabric so you won’t be able to gather the fabric tightly enough close the hole with your running stitch. I cut a circle of felt and stitched it over the hole at the bottom of the pumpkin. The hole at the top was covered by the felt stem.
To make a pumpkin pillow, check out my revised post for instructions.
Next week, we’re doing some holiday planning on “Call Me Grandma!”
Sign Up to Get Grandma’s Favorite Recipes–Free!

Sign up here for my email newsletter. Every Wednesday, I’ll give you a new idea for an activity or insight to nurture the little ones in your life. And once you subscribe, I’ll send you a link so you can download your set of quick and easy recipes as my thanks to you.
Pumpkin Pillow
Materials Needed
- Soft fabric (mine was about 36 inches wide by 20 inches high)
- Strong sewing thread (I used crochet thread)
- Yarn in the same color or contrasting color to make the indentations
- Polyester fiberfill or other stuffing material
- Matching felt for the pumpkin base
- Brown felt for the stem
Tools Needed
- Sewing machine (or stitch by hand)
- Sewing needle for thicker thread
- Ruler
- Fabric scissors
- White school glue
Instructions:
Step 1: Cut fabric to the height and width you want your finished pumpkin to be, allowing a half inch seam allowance along the top, bottom, and sides. The grain should run vertically, along the height of the pumpkin.
Step 2: Fold fabric in half, right side in, and stitch 1/2-inch from the lengthwise edge. If you don’t have a sewing machine, you can hand stitch, using tiny stitches.
Step 3: Turn the fabric right-side out and using heavy thread, stitch a running stitch along the bottom of the pumpkin, 1/2-inch from the edge. You have to sew the entire bottom of the pumpkin using a single thread, without breaking the running stitch. Now pull the fabric tight, a little section at a time, gathering the fabric until the entire bottom is gathered tight. Take a few stitches from one side of the pumpkin to the other to tighten the hole.
Step 4: Stuff the pumpkin with fiberfill almost to the top. Now run a row of running stitches along the top of the pumpkin, 1/2-inch from the edge and gather the fabric until the entire top is gathered tight. Take a few stitches from one side of the pumpkin to the other to tighten the hole.
Make the Pumpkin Indentations
Step 5: This is where the ball becomes a pumpkin. You’re going to wind yarn around the ball in three places, from top to bottom, to create 6 bulges. Leave some lead yarn at the top of the pumpkin, then starting at the top of the pumpkin, wind the yarn from that point, down and around to the opposite side and pull tightly to create a bulge. in the ball. You can tie it here or twist the yarn, like tying a present, and repeat the process two more times so you end up with six pumpkin wedges. Tie the yarn tightly to hold the bulges in place.
Make the Pumpkin Stem
Step 6: Cut a strip of felt the heigh you want your pumpkin stem to be. Roll the strip, securing with white glue occasionally, until your desired thickness is reached. You want the stem to be thick enough to hide the running stitches at the top of the pumpkin, where you gathered the ball. Use a needle and thread to stitch the end of the fabric strip to secure the pumpkin stem.
Finishing the Pumpkin
Step 7: Cut a circle of felt larger than the hole on the bottom of the pumpkin and stitch the circle to the pumpkin bottom. Stitch the stem to the top of the pumpkin.